

Hey Everyone! Ken here with Ken's Kreations.
Recently I shared my first video in the series comparing the Cricut Explore Air 2 vs Silhouette Cameo 3 vs Brother ScanNCut 2. If you missed the first part to this video, you can watch it by CLICKING HERE. This video has received a ton of response since debuting, that I am excited to share the next video in the series. In this video we will just be looking how each machines performs on cutting materials. I am happy to now share with you:

In the first video and blog post we compared the Cricut Explore Air 2, Silhouette Cameo 3 and Brother ScanNCut 2 in regards to features and benefits, Print-Then-Cut and the drawing feature. You can see the entire blog post of the first part of the series by CLICKING HERE. The first part of this 3 video series only scratch the surface of these machines, and I am really excited to push these machines to their limits by comparing how each of them cut in the second video! That is really want people want to see, and I am happy to deliver them. So in the video we will compare how each machine can cut the following materials:
For all machines I used a new mats, blades, and 3rd party supplies. Also if the machine WAS NOT able to cut with their approrpiate standard blades, I would run test again with the appropriate Deep Cut Blades.
So this video did surprise me in many ways. I have always turned to my Cricut Explore Air 2 for thicker materials due to my personal experience. However in this video I was surprised to see that the Silhouette Cameo 3 was able to handle materials that it was not able to in my earlier videos. What REALLY surprised me is how well the Brother ScanNCut 2 handled thicker materials. Now keep in mind that even though all three of these companies off Deep Cut Blades, they are far from the same. Lets take a look at the difference:

The Brother ScanNCut 2 Deep Cut Blade is much larger and has a higher angle than those for the Cricut Explore Air 2 and Silhouette Cameo. Both of these look just like the standard blade that has been extended. Now that you can see the differences let's take a closer look at our material tests. Now I have saved all of the settings that I used for these machines so you can also do your own testing. These worksheets will also tell you what blade was used. In some of my test, the deep cut blade was used and it would be represented on these worksheets. You can find those here:
Brother ScanNCut 2 Cut Settings
Cricut Explore Air 2 Cut Settings
Silhouette Cameo 3 Cut Settings
80 LB Cardstock
80 LB Cardstock
(CUT SETTINGS IN ABOVE DOCUMENTS)
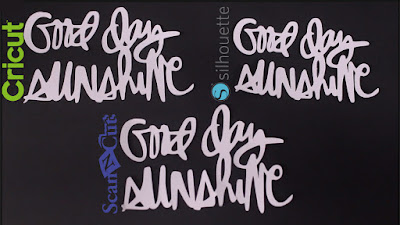 CLICK ON PHOTOS FOR LARGER IMAGES

Interesting thing is I cut all of these the same sizes, but the Silhouette Cameo 3 cut it at a smaller rate. The only issue I saw was a little less precises cut on the Brother ScanNCut 2. Cricut Explore Air 2 was able to cut this up to 2X the speed without losing any precision.
White Vinyl
White Vinyl
(CUT SETTINGS IN ABOVE DOCUMENTS)


AC Glitter Cardstock
AC Glitter Cardstock
(CUT SETTINGS IN ABOVE DOCUMENTS)


 CLICK ON PHOTOS FOR LARGER IMAGES


(CUT SETTINGS IN ABOVE DOCUMENTS)


Cricut Explore Air 2 Cut Settings
Silhouette Cameo 3 Cut Settings
80 LB Cardstock
80 LB Cardstock
(CUT SETTINGS IN ABOVE DOCUMENTS)


Interesting thing is I cut all of these the same sizes, but the Silhouette Cameo 3 cut it at a smaller rate. The only issue I saw was a little less precises cut on the Brother ScanNCut 2. Cricut Explore Air 2 was able to cut this up to 2X the speed without losing any precision.
White Vinyl
White Vinyl
(CUT SETTINGS IN ABOVE DOCUMENTS)

CLICK ON PHOTOS FOR LARGER IMAGES
Obviously the settings on the Brother ScanNCut 2 did not produce a kiss cut, however it had no issues. Cricut Explore Air 2 was able to cut this up to 2X the speed without losing any precision.
Siser Heat Transfer Vinyl
(CUT SETTINGS IN ABOVE DOCUMENTS)
CLICK ON PHOTOS FOR LARGER IMAGES
Cricut Explore Air 2 was able to cut this up to 2X the speed without losing any precision.
AC Glitter Cardstock
(CUT SETTINGS IN ABOVE DOCUMENTS)

CLICK ON PHOTOS FOR LARGER IMAGES
Fun Foam
(CUT SETTINGS IN ABOVE DOCUMENTS)

CLICK ON PHOTOS FOR LARGER IMAGES
This is the first time we see a difference in the cuts. The Cricut Explore Air 2 and Silhouette Cameo 3 was able to cut this with their standard blades, however we had to "punch" out the design. The Brother ScanNCut 2 would only cut this using the Deep Cut Blade, but did not require us to punch out the design.
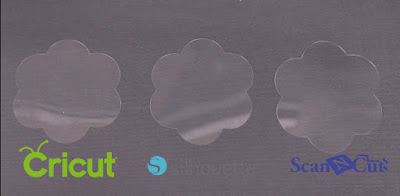
Acetate
(CUT SETTINGS IN ABOVE DOCUMENTS)

CLICK ON PHOTOS FOR LARGER IMAGES
This was my first surprised result of the video. In my original Cricut Explore vs. Silhouette Cameo: Material Cutting video test (WATCH HERE), the Silhouette Cameo was not able to cut through Acetate. However, during this video all three machines cut through acetate with no issues. Not only was the Silhouette Cameo 3 able to cut through the Acetate material, but it did so using the Auto Blade
Shrinky Dinks
(CUT SETTINGS IN ABOVE DOCUMENTS)

Okay so this is very interesting to me. The Cricut Explore Air 2 has never had issues cutting Shrinky Dinks, however I have never been able to cut Shrinky Dinks on the Silhouette Cameo 3. After my first test cuts, I figured it was the same story again with the Silhouette Cameo 3, as you can see in photo one. Even with the Deep Cut Blade turned all the way up, the Silhouette Cameo 3 just cannot cut Shrinky Dinks. That is until I tried cutting it a different way. I have always cut Shrinky Dinks with the glossy side down. Well, let me tell you with the glossy side up, ALL THREE machines had improved cuts with the Shrinky Dinks. Now what really impressed me was with the Brother ScanNCut 2. This machine is able to easily cut this material AND in ONE PASS! So if you are trying to cut Shrinky Dinks and are having issues, try to cut it glossy side up. Now, keep in mind even with this little trick, the Silhouette Cameo 3 still struggled to cut this material as seen in this photo:

Thick REAL Leather
(CUT SETTINGS IN ABOVE DOCUMENTS)

CLICK ON PHOTOS FOR LARGER IMAGES
All three machines were able to cut this, however only the Cricut Explore Air 2 gave me a clean cut. Both the Silhouette Cameo 3 and Brother ScanNCut 2 struggled with this material. It was able to cut it by squishing the material under the rollers, however it left it with frayed edges. We also saw with the Silhouette Cameo 3 and Brother ScanNCut 2 an issues on where it started the cut. The place where both of these machines started the cut had to be cut away from the leather. So the Cricut Explore Air 2 TECHNICALLY was the only one to cut all the way through. The Silhouette Cameo 3 and Brother ScanNCut 2 came apart from the other leather when being lifted off the mats.
2MM Chipboard
2MM Chipboard(CUT SETTINGS IN ABOVE DOCUMENTS)

CLICK ON PHOTOS FOR LARGER IMAGES
The only machine to cut 2MM Chipboard was the Cricut Explore Air 2. Now I tried everything to get the Silhouette Cameo 3 and Brother ScanNCut 2. Even though the Silhouette Cameo 3 allows for cutting up to 2MM thick material, even with their Deep Cut Blade, I could not get the Silhouette Cameo 3 to cut this stuff. Now the Brother ScanNCut 2 wanted to cut this stuff and really it could, but the machine did not allow enough room for it to pass. The blade could cut it, but as soon as the 2MM Chipboard went under the rollers it would jam. You can see this in the following photo:L

FINAL THOUGHTS
So it is clear to me after this video that the Cricut Explore Air 2 is the best machine for cutting a wide variety of materials, including THICK materials. Still I was surprised on the Silhouette Cameo 3 was able to cut material I have never been able to cut before and with better precision than in the past with the previous Silhouette Cameo Machines. However, the real surprise for me was the Brother ScanNCut 2 . I have only used this machine to fussy cut stamps, so I was kind of blown away by this machines ability to cut thicker materials. Now keep in mind the Brother ScanNCut 2 Deep Cut Blade is longer and more angled giving it a slight advantage in my opinion. Still this little machine impressed me with cutting thicker materials. Even with this, I still recommend the Cricut Explore Air 2 for cutting a wide variety of thicker materials.
MAKE SURE TO SUBSCRIBE TO MY YOUTUBE CHANNEL
I am excited to start the 3rd part of the Cricut Explore Air 2 vs Silhouette Cameo 3 vs Brother ScanNCut 2. Now Silhouette America and Cricut have both announced updates to their software that run these machines. In order to get you the most complete information, I will hold off on the 3rd video until both companies have updated their software. Make sure to Subscribe to my YouTube Channel so you do not miss out on this video when it is released.
ALSO PLEASE USE MY LINK BELOW TO PURCHASE YOUR MACHINE
I get a small commission from amazon when you use my links to help offset the time I put into these reviews. This is at no cost to you and has not influenced my blog write-up.
Remember caring is sharing and I would love for you to share this post.
PRODUCTS USED IN THE PROJECT:


Thanks for supporting Ken's Kreations. As an Amazon Associate, I earn from qualifying purchases.


No comments:
Post a Comment