Hey Everyone! Ken here with Ken's Kreations.
Well many of you know that I am featuring some of the the amazing things that the Cricut Explore Air can do. AND.....I am giving one lucky person a Cricut Explore Air (see bottom of the post).
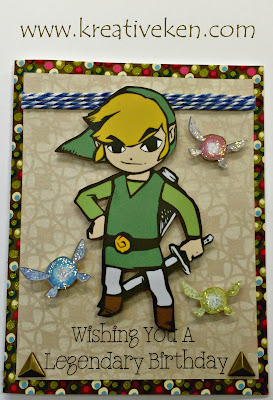
Today we are going to take a look at the ability to use the Print-Then-Cut feature of this machine and how you can take any image and import it into Design Space and clean it up for Print-Then-Cut. Here is the project for today:
So my nephew-in-law is a huge Zelda fan so I knew I wanted to make a card featuring Link. Now in order to complete this card you will need to use the Print-Then-Cut feature of your Cricut Explore Air. This process will use your Home Printer to print the images and then your Cricut Explore Air will cut the images using registration marks. Here is a video showing you how easy this process is:
Now that you know how to use the Print-Then-Cut feature lets talk about how to get this card ready for assemble. I used DCWV Whimsical Paper Stack for the base of the card. The second layer of the card that link sets on is from the DCWN Cinnamon Luster Stack.
Once these are cut out we can focus on the Print-Then-Cut images. Now for Link File (zelda) I used a file that was found HERE. Now this file is an SVG file and will need to be flattened to get ready for Print-Then-Cut. Here is a video on how to do this:
Now as you can see on the card next to Link File (zelda) you will see three fairies. These fairies images were actually found doing a Google Image Search. For this card I used the Yellow Fairy, Blue Fairy, and Red Fairy. Now you can upload these images into Design Space by following this video:
Now I print all of my images on an Epson Artisan 1430 using Heavy Duty 110lb Cardstock. Then the Cricut Explore Air will cut out all of your images using the Print-Then-Cut registration marks. Now we can just add some Diamond Stickles to the three fairies. For the sentiment I the font that has writing style found on A Child's Year Cricut Cartridge. I used the Cricut Fine Point/Calligraphy Pen Set. I finished the card off using wrapping some Blue Twine around the top of the card. I raised Link File (zelda), Yellow Fairy, Blue Fairy, and Red Fairy up using Foam Tape.
I just love how this project turned out and how easy it was using the Print-Then-Cut feature in Cricut Design Space. I will be featuring one more projects this week highlighting other features of the Cricut Explore Air.
Now I am excited to announce that I am giving one of my lucky subscribers a change to win a Cricut Explore Air. Make sure to take a look at ALL of the different ways to enter this contest. You have a 7 different ways to enter this contest that will give you a TOTAL of 10 entries!!
Don't forget to take a look at all the supplies I used in making these projects! Thanks for always supporting Ken's Kreations!!
ALSO OAK TREE STAMPS IS HAVING A SALE 20% OFF ENTIRE STORE
This post may contain affiliate links. If you purchase a product using the link I may receive a commission. I only participate in affiliate programs for products that I use or can recommend. Thanks for supporting Ken's Kreations


No comments:
Post a Comment